Tuesday, December 11, 2012

Joy Tarts

I have many things I should be doing right now like laundry, cleaning, making meals, but something in me needs to be creative and expressive...so blog it is.  I have been meaning to blog this recipe for some time and now seems the perfect day and space.  Joy Tarts! 

This recipe was first discovered from a favorite blog I follow but made as larger Mounds Candy Bar . The Canadian equivalent to the US Mounds is "Almond JOY" and as I do love those bars, I knew I had to try this recipe.   Although there are so few ingredients in it that there is not much really to change, I did make a faster chocolate mix that keeps this more simple and faster.   And in a smaller form, I find them perfect for the Christmas season to decorate a plate to share with others. 

Although it is a short, simple word of three letters, Joy is not so simple to define.  For me, the word really does make me smile, it is not defined as happiness, and it stirs something  life-giving deep within me.  However you might define it, my hope is that by making these and sharing with others, they will extend life and a sense of Joy.

Joy Tarts
(makes 36 mini tarts)

1 1/2 cups unsweetened coconut (medium shred)
1/2 cup coconut oil * (virgin organic and cold-pressed coconut oil is my preference)
1/4 cup liquid honey  (prefer raw honey)
1 tsp almond extract

36 whole almonds - toasted
1 cup semi-sweet chocolate chips
1- 2 Tbsp coconut oil
* See Cook's notes below

On very low heat, melt the coconut oil and honey as desired.  Coconut oil is firm and white colored at room temperature but will melt and turn clear on a warm summer day or just in the palm of your hand.  I would recommend using a slightly warm oven (with the coconut oil in a glass bowl), or a low heat on a stove top to liquefy the coconut oil.  No cooking is necessary and strongly discouraged to keep the nutritional value high as high as possible in the oil and honey.


 Add the extract and coconut and stir to combine.  It may appear as if there is not enough liquid but it does work.


Using a mini muffin pan, scoop about 1 - 2 tsp of coconut mixture into each cup.  Again, it will not look like much is there but it is plenty when you bite into them.  You may want to press down with your spoon on the tops of the tart to smooth out the surface.  Chill the tarts in a freezer for about 20 minutes.


While that is chilling, toast the whole almonds.  I put my nuts in a toaster oven and just heat them on a low heat for a couple of minutes - stirring in between.  If you don't have one, use a small skillet on the oven top (with medium heat) and stir the almonds until lightly fragrant and toasted.  Set aside to cool.


Then melt the chocolate chips and coconut oil in a double-boiler or using the microwave if you prefer.

Remove the coconut tarts from the freezer.  Pour a small amount of melted chocolate on each tart and top with a whole almond.


Return the tarts to the freezer for another 15 - 20 minutes.  Once they are solid, they pop out of the pan pretty easy using a butter knife or nylon tool suitable for your mini muffin pan.

Best to store the tarts in the freezer.  I enjoy them best while they are served cold - even right from the freezer!


Cook's Notes:
Coconut Oil
This oil is definitely a healthy one found in health stores and health food section of major grocery stores.    Like most things, you get what you pay for with coconut oil.  I would suggest finding something virgin, organic and cold-pressed for the most nutritional value.  If you are not a fan of the coconut flavour (you likely won't be making these then) you can buy cheaper options as they often taste like nothing but they won't have the same nutritional value. 
Of the examples pictured, the Nutiva is (found at the Bulk Barn) is and is great overall option at a fair price.  The black container (bought at Zehrs) has no coconut flavour and was cheaper.  The left-side option was the best flavour and most expensive too.  Choose what works best for your needs and budget. 

The beauty of coconut oil is it is solid at room temp but will melt on a warm summer day or with the warmth of your hand. In this recipe, it helps the tart to stay solid and firm providing they do not get too warm.
In addition to using it in cooking/baking (in place of butter or oil), coconut oil is overall a wonderful oil to use for any skin irritations, dry skin, dry lips - either applied topically or eaten by the spoonful. When your jar is running low, be sure to save the little bits left for your skin needs.

Monday, September 24, 2012

Pumpkin Coconut Loaf


A couple of years ago, my neighbour called me asking to borrow some coconut milk for a pumpkin loaf she wanted to make.  Coconut milk and pumpkin?  Yummy!  So after looking at the recipe as found on-line, I was even more intrigued as it also had no eggs in it either making it dairy-free and vegan!  That is not common in yummy baked goods!  So to make it family-friendly for us, I did swap out the flours and sugars and oils and the loaf is absolutely delicious  (as I am sure it is in the original recipe as well)!  So moist.  So yummy.  So PUMPKIN-PERFECT for fall!  You really must try it.

Pumpkin Coconut Loaf

1 3/4 cup Spelt flour
1 tsp baking soda
1/2 tsp sea salt
1 tsp cinnamon
1/2 tsp nutmeg (optional)
1 cup pumpkin puree *
1/4 cup oil (safflower, coconut, or oil of choice)
1/4 cup unsweetened applesauce
1/2 cup coconut milk or non-dairy milk *
3/4 cup palm sugar
1/2 cup unsweetened coconut
1/2 cup walnuts (optional)*

Preheat the oven to 350F.  Grease a 4"x8" loaf pan or line it with parchment paper.


In a large bowl, combine the dry ingredients (flour, soda, salt, cinnamon, coconut, and nutmeg if using).
In a smaller bowl, combine the pumpkin, oil/applesauce, coconut milk, and palm sugar (or whatever sweetener being used).  Mix well.  Pour this liquid mixture into the dry ingredients and stir gently until all is combined.  Pour into a prepared loaf pan (either lined with parchment or greased as required to easily remove the loaf).


Bake for 1 hour.  The original recipe says to bake for 1 hour and 15minutes but I found 1 hour was perfect.  Allow the loaf to cool for 5 - 10 minutes in the pan and then remove it and allow to cool on a cooling rack.  Enjoy!

This recipe is easily doubled to create two loaves if you prefer - one for yourself and one to give away!


Cook's Notes:
Pumpkin Puree
Canned pumpkin puree is fairly common and easy to buy and use for this recipe but you could also bake a fresh pumpkin and make your own pureed filling.  If looking for canned pumpkin, be sure to use Pumpkin Puree.  Pumpkin pie filling, the other canned pumpkin in the store,  has sugar and added spices you don't need in this recipe so you don't want to buy this for the recipe.

Coconut Milk
This milk is found in either cans or in tetra packs usually with other non-dairy milks.  Either is fine.  I have moved to buying the larger tetra pack coconut milk as I use it much more frequently in my foods. Leftovers coconut milk can be stored in the fridge for a few days and used in Thai foods or soups, or the extra frozen and thawed for later use.  If you don't have coconut milk, you could use another source of milk (dairy or non-dairy) in equal amounts.

Walnuts
I love nuts in any food I make, however, I do not like how it makes a loaf more difficult to slice.  So your choice.  I also like the "school-friendly" option without them.


Tuesday, July 31, 2012

Mexican Eggs

Egg meals.  We have them frequently, alternating between breakfast, lunch and suppers because they are so healthy, fast and easy.  Also a perfect option for when the weather is hot too.  But I do get tired of just the regular "Fried Egg". 

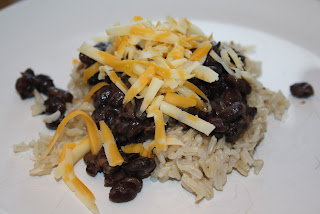
This version I enjoy most for suppers as it feels more like a "meal".   With a little planning ahead, it is very quick too.  The fastest version involves using leftover rice and canned beans with eggs and toppings.  The longer option -  you can cook your own black beans, make fresh rice and top with eggs and fresh toppings.  Either way, this meal has more bulk than just eggs and toast and lots of FABULOUS COLOR on the plate.  I am coming to realize I really enjoy my food more when there is lots of color to it.   Doesn't that look more delicious below than just the eggs above!?!?!


 Friends who have travelled to South American countries have told me that rice with beans and eggs is very common in many places down south...I just have not been to those places yet. This is my version of Mexican Eggs as inspired by chef Jose who sells something similar at the Market Square in St. Catharines - his is not as colorful!


Mexican Eggs

(To make 4 servings)
2 - 3 cups of cooked brown rice
1 cup dried black beans*  or 1-19oz can of beans
8 - 12 eggs
1 cup Cheese of your choice* - shredded
1 Tomato - diced
1/4 - 1/2 cup fresh cilantro* - finely chopped
Salt and pepper to taste

*see Cook's Notes below


Using brown rice (long grain, basmati or jasmine are common finds), cook the rice according to the directions, or use leftovers.
Canned black beans should be thoroughly rinsed.  Add them to a small pot with a little water and salt and pepper if desired and cook until they are heated through.  See cook's notes below for directions on cooking them from dry beans.   If you have never tried cooking your own beans, you should give it a try. 
Cook your eggs according to your own preference.  We all prefer this dish with our eggs sunny-side up or over-easy so the yolks are runny.
To assemble, place a serving of warm rice on a plate. Top it with the black beans, cheese, followed by the eggs on top (to melt the cheese), then the chopped tomato and cilantro. Enjoy!


Cook's Notes:
Black Beans: If using dried beans, it is super simple to make them up for eating with this dish, it just requires planning ahead. Soak 1 cup of beans in about 4 cups of water for 24 hours. If you think of it, rinse and add fresh water once throughout that time. After 24 hours, drain and rinse the beans with fresh water. Add the beans and enough water to cover them in a medium pot, along with a small onion roughly chopped. I read somewhere once that you should not add salt while they cook as that makes the beans hard...so I don't add salt at this point. Cook the beans over low-med heat for 2 - 3 hours. Towards the end of that cooking time, I add some sea salt to taste. Add more water if necessary through the cooking time. Remove the onion and serve the beans (or rinse first before serving if you prefer but I kinda like that liquid and flavour).
  
Cheese: Feel free to experiment with the cheese here.  The perfect option would be Queso (Mexican cheese) but I don't know a good source that is local here.  I have heard Feta is a close option to that, or you can always stay American and go with marble or cheddar.  Whatever you choose, just shred it or crumble it up.


Cilantro: This is a herb that people either love or don't like it so much.  I really enjoy it and put it in most of my food.  If you are not so much of a fan, you can try fresh parsley as well.
When purchasing cilantro, try to always buy it with the roots intact.  Although it is often dirtier, your cilantro will last much longer if the roots are intact.  And it should have a crisp feel to it and stand up straight - not be gimpy and wilted.
To store it, wash it to remove all the soil hiding inside the stems, and then put it in a container (I use a plastic container as seen here only it holds parsley) with water to cover the roots and more water if needed to keep the container from tipping over.   I try to let it sit on the counter for a couple of hours this way to allow the leaves to dry.  Then I cover the tops loosely with a plastic bag (usually the one I just bought it in).  It will keep this way in your fridge for a good 10 days and longer if it is not too crowded in the container.  Changing the water every 3 - 4 days also helps if you can remember to do it. 
To use it, you can finely chop it on a cutting board with a knife.  Very chef-life and fun.  In a pinch though, I also like to cut off what I want, put it in a small bowl and go at it with a kitchen scissor until it is all cut up  finely.  Just my suggestions.


Cooks' Notes:

Wednesday, July 4, 2012

Chocahini Bars

I have been on the hunt for recipes of foods to send with my kids to school that are simple and something like a granola bar.  Here is one recipe I adapted  from an old cookbook someone gave me called "The Snack Bar Gourmet". (This book is a great little treasure published in the 80's filled with many healthy treat options). The final result is a soft, slightly chewy bar that is really enjoyable .  More recipes will be coming thanks to that book.

Chocahini is also a perfect bar that is allergy-friendly for all sorts.  It is gluten-free, wheat-free, egg-free, nut-free, dairy-free...AND it still tastes delicious!!!  And to top it off, simple and quick to make.  The key is using tahini which you may have to go out and buy.  Now that school is out, you can also make it with peanut butter if nut allergies are not a concern for you.  Let me know what you think when you try it.


Chocahini Bars

1/2 cup tahini*
1/3 cup honey or maple syrup
1/4 cup non-dairy milk (ie rice, almond, hemp or you can use dairy milk too)
2 Tbsp unsweetened cocoa powder
1 tsp pure vanilla extract
1/4 tsp sea salt
2 cups oats - my preference is Old Fashioned Oats
1/4 cup unsweetened coconut
1/4 cup seeds of choice (sunflower, sesame, hemp, pumpkin) - optional
1/4 cup mini chocolate chips
* See cook's notes below

Preheat your oven to 350 F.
Using a 9x9 baking dish, line the dish with parchment paper for easy removal and cutting after it has baked.

In a large bowl, add the tahini, honey, milk, vanilla, cocoa and salt.  Mix this together using a spoon.  Then add in the remaining dry ingredients and stir until completely mixed.  Pour into the lined baking dish and bake for 20-25 minutes.
Allow to cool and slice into bars.  Makes about 16 bars or 20 if you cut them smaller.  This recipe would double nicely and bake in a 9x13 pan (they may just be a little thicker).


Cook's Notes:
Tahini - this is a sesame seed paste that is used in many Middle Eastern dishes.  It is also a key ingredient used in making hummus.  You can find it in Bulk Food stores (in a cooler section) and most likely in an Ethnic store or Ethnic section of a grocery store.  It has a consistency a little thinner than peanut butter. 


Wednesday, June 27, 2012

Watermelon Kale Salad


I recently planted kale in my garden and have been enjoying it as salads with our meals. 

From various combinations created, this salad is one we all enjoy.  It is a colorful, healthy, and yummy version of a salad that is perfect for enjoying in summer outside. 

  The simple dressing was taken from a Michael Smith recipe I recently enjoyed with my gourmet group. This salad looks beautiful with the dark greens, pink melon and white cheese, and the dressing is strong in flavour to pair up with the kale. The toasted nuts create a lovely crunch and nutty flavour to the fresh produce. A great pairing of food in every way...and a big hit with all my friends who have tried it.


One of my pet-peeves of salads is when they are made in bowls and all the toppings are either on the top (so the first few to eat get them all) or they all fall to the bottom (and the last to eat it get them all). My solution to this problem...to create a salad on a plate. The bigger the salad, the bigger the plate and ALL toppings are equally distributed and enjoyed by all. Plus it looks so much more appetizing with all the toppings visible.  So here is to Plate salads!


Watermelon Kale Salad

Dressing:
2 Tbsp Balsamic Vinegar
2 Tbsp Dijion mustard
1 - 2 Tbsp liquid honey (or applebutter, or maple syrup, or agave nectar)
4 Tbsp Olive Oil
Sea Salt and Black pepper

Using a shaker or bowl that allows for good whisking, add the vinegar, mustard and honey and whisk or shake until well mixed.  Add in the oil and whisk/shake until blended.  Season with sea salt and fresh black pepper.  You can make a large batch and store the remaining dressing for a week in the fridge.

Salad:
* please note all amounts for the salad are approximate. I never measure my ingredients for something like this so the amounts are approximate.
5 cups Kale* - cut into fine pieces ( or as much as you need for your salad)
1- 2 cups Watermelon - bite-size cube pieces
1 cup cucumber - diced into bite-size pieces
1/4 cup Almond pieces - lightly toasted
1/4 cup Feta Cheese - crumbled
1/2 cup Fresh cilantro - finely chopped

In a larger bowl, place the Kale and cilantro.  Toss with the desired amount of dressing.  As the kale has a stronger, thicker leaf, it will not wilt with the dressing on it like regular lettuce would but leftovers may be soggy leaves by the following day.


Using a large serving plate, place the kale over the plate.  Sprinkle the remaining ingredients over the the kale to create a beautiful artwork of food.  Enjoy.


Cook's Notes:
Kale - For those new to kale, it is a member of the cruciferous family (ie broccoli and cauliflower) and has great nutritional values - raw, steam, sauted, or cooked. It can be mixed in with other greens, added to soups and stews and is often used in smoothies. 

From the picture of my garden, you can see the frilly edge of the kale, and it is very easy to grow and harvest.  So far it is bug-free as well.  In contrast with my overgrown squash plant and the light green leaf lettuce, the kale has a bluegreen color which I like on my plate. 
For enjoying in my salad, I will either cut my kale with a knife into thinner slivers (a bit like you cut cabbage) or tear it into small bite-size pieces.  Some say to massage your kale before cutting and dressing it to decrease the bitter taste.  I have not been hard-core on this as my kale is young and more tender but it may be worth trying.

Wednesday, April 18, 2012

Fresh Herb Goat Cheese Spread

Here is a fantastic new appetizer spread/dip that is a guaranteed hit with any crowd...I am always asked for the recipe!  It took me a while to make this cause we do not often have the soft goat cheese in our fridge but now that we all enjoy this spread, goat cheese is almost always on-hand.  It is perfect for the upcoming BBQ party season.  This tastes really fresh, nutritional in it's 'rawness' (a lot of calcium in parsley)and hugely versatile IF you have leftovers!

If you do not think you are a 'goat cheese' fan, please do not pass on this.  Tasters have often told me it does not taste like the strong goat cheese they expected which would be due to the yogurt mixed in and the strong herb flavours on top.    The yogurt also helps to create a creamy, smooth cheese that is more spreadable than just goat cheese.  And the mix of herbs is really versatile.  Feel free to mix it up with what you have growing in your own garden to create something unique every time.

Inspiration came from friends Carolyn and Debbi who made this from the Simply Balanced cookbook.  I found a few tweaks of my own made it even more enjoyable for my liking and easier to make.  Let me know what you think!  Be sure to read all the variations and options for using a spread like this in your meals.

Fresh Herb Goat Cheese Spread

1 - 1 1/2 cup fresh cilantro - finely chopped or snipped
1/2 - 1 cup fresh parsley - finely chopped or snipped
1/2 cup additional fresh herbs like basil, thyme, mint, tarragon - optional
150 grams Goat cheese or small cheese log (picture above is a large goat cheese 300 g)
1/4 cup plain yogurt
1/4 cup sun dried tomatoes - finely chopped
1/4 cup walnuts - finely chopped
2 Tbsp Olive Oil
1 clove garlic
1/4 tsp sea salt
1/4 tsp black pepper

Add the goat cheese and yogurt in a small bowl.  Using a spoon, combine these to create a smooth, spreadable cheese.  Spread this mixture into a 9" pie plate or larger plate making about a 9" circle.  It may not appear to be a thick layer but the cheese has a strong flavour and the amount works with the fresh herb layer.


In a separate bowl, add the parsley, cilantro and any other herbs you are using.  The fastest and
 easiest way to finely chop the herbs is to put the herbs (and stems included) into a bowl and
using a kitchen scissor, start snipping the herbs until all are finely chopped.  No need for a big
cutting board and knife and mess to clean up.  Love this method!!! 

Also, the amount of herbs is not too critical.  I prefer cilantro to parsley hence I use more but feel free to mix it up.  And the overall amount of herbs you want (before finely chopped) is about 2 cups of loosely packed herbs. By the time I am done mincing it, I get about 1 cup of finely chopped herbs.

Add in the garlic, oil, salt and pepper, sun dried tomatoes and walnuts. 


Let the mixture to sit for 15 - 30 minutes, if you have time, to allow the flavours to blend.


Add the fresh herb pesto on top of the goat cheese mixture. 
 It presents nice if you leave goat cheese showing on outer edge.


Serve immediately with your crackers of choice or refrigerate until needed. 


Variation 1 - Lemon
Add the zest of half a lemon to the herb mixture before layering on the goat cheese.
Variation 2 - Balsamic
Drizzle a quality balsamic vinegar over the herb topping or add it into the herb mixture  before adding to the top of the goat cheese.
Variation 3 - Baked
Combine the cheese and herb mixture and using a oven-proof dish, heat the mixture (about 400F for 10 min) and serve warm with crackers.
Variation 4 - Burger/Sandwich spread
Mix the cheese and herbs and add the spread onto burgers, sandwiches or fresh bread.
Variation 5 - Pasta
Add to pasta for a cheesy herb pasta.  Mix in sauteed zucchini and peppers with a side of BBQ meat.
Variation 6 - Pizza
Mix the cheese and herbs together and add to a pizza crust/tortilla.  Top with olives, tomatoes, red onion, zucchinis and bake/broil.

Tuesday, April 17, 2012

Fiesta Chicken

I recently borrowed a cookbook called Gourmet Nutrition from a friend and started to try out several new recipes.  As I flipped through the book and its delicious looking pictures, there was one recipe that immediately caught my eye and I could hardly wait to try.  It was filled with bite-size food and a beautiful mix of colors and it had a Mexican flavour to it.  (My picture below does not have all the toppings yet but shows the colors nicely!) 


When I got cooking in my kitchen, I had fully expected to make the dish as instructed but had a last minute thought (due to a child preference) and tweaked it just a little.  As I stirred the dish, I knew what I made was going to be good based just on how it looked and started taking pictures even though I had no plans to blog it.  Once I finally got to sit down and eat it, I was in love.  We all loved it a great deal.  The sweet and spicy flavours, soft and crunchy foods, the hot food with the cool touch of yogurt - AMAZING!!!  Like a party in your mouth!

Aside from the color and flavours already mentioned, this meal is also a favorite for several reasons:
1.  Very quick to make (with planning)
Since I started meal-planning, it allows me to make extra chicken and roast more veggies (like the sweet potato) ahead with other meals so the bulk of this meal is ready for dicing and heating.
2.  A no-grain meal
In my style of cooking, my natural thinking on this meal would be to serve this over a bed of rice, however, my reading has lead me to reconsider just how much grain is in my diet and look to see where it can be omitted - such as this meal.  The Gourmet Nutrition cookbook really emphasized this.  And really, you do not need it at all.  As for the corn, some do consider that a grain however, in my dish, it is a veggie!!  I like the yellow color it adds and also the crisp bite of sweetness. 
3. A meal with no cheese 
Again, my cooking instincts on Mexican flavoured food requires cheese but this does not need it.  Trust me.   Cheese always tastes good on food but it is not needed here at all and I like that.  Resist the urge and try it 'naked'.  The yogurt topping offers a great creamy texture and flavour contrast in place of the cheese I suppose and fewer calories too!

One last comment that has to be made...the roasted nuts are not optional here.  Really.  It is the surprise ingredient that helps creates the magic in this dish.   Now here is the recipe so that the rest of you can enjoy this delicious meal of beautiful color, textures and flavours.  Happy eating!


Fiesta Chicken


2 chicken breasts - cubed and precooked
1 sweet potato * - roasted and diced
1 cup frozen corn
1 cup frozen green peas
1 cup canned beans (black or red) - rinsed thoroughly
1 fresh tomato - diced
1/2 fresh cilantro - finely chopped
1 Tbsp DIY Taco Seasoning *
1/4 - 1/2 cup water (or more as needed)
1/2 cup almonds - roasted and chopped
1/2 - 1 cup plain yogurt *

In a large skillet, add the cooked chicken, sweet potato cubes, corn, peas, beans, seasoning and water.  Mix thoroughly and heat through.  Add more water if necessary so the food does not stick in the pan.  Add the diced tomato and fresh cilantro and heat for another minute or two.


To serve, top with a dollop of plain yogurt and roasted almonds (they are not optional!)


Cook's Notes:

Roasted Sweet Potato - For this dish, it works fastest to use a pre-cooked sweet potato.  After it is cooked, a cooled potato will chop us easily and hold it's shape better.
The baking process allows the natural sugars to roast and creates a sweeter potato and it is simple.  Just 1. wash the skins and add the potatoes to a baking dish. 
2. Poke them with a fork to allow the steam to escape and prevent explosions.
3. Cover the dish with a lid or foil (I find they bake faster this way)
4. Bake at 350 F for about 30 - 45 min  or until desired for cooking purposes.  Test with a fork to see how firm the potato is.  This amount of time will depend on how big the sweet potatoes are. When using sweet potatoes in pieces for this dish, they can be baked a little less so they remain in shape (hence less baking time).  If using your potatoes for mashed sweet potatoes, then I would bake at least an hour or more.

Roasted almonds - For a recipe like this, it really does not matter if you use raw or roasted almonds but I really prefer the flavour of the roasted and the crisper crunch. 
1. To roast them, I chop the almonds in a food chopper or with a knife on a cutting board to desired size.
2. Using a frying pan on your stove top, heat the pan over med heat and add the chopped nuts.  Add the nuts to a dry pan and stir them until they become golden and smell fragrant.  If you walk away, they are likely to burn - the laws of cooking.

DIY Taco Seasoning - I posted this recipe a few weeks ago on my blog.  Any taco seasoning mix can be used for this recipe but the amount will vary.

Plain Yogurt - My family uses plain yogurt in place of sour cream.  It is a very easy swap to make and prevents me from having both yogurt and sour cream in the fridge.  Plus the yogurt does have healthy bacteria in it that sour cream does not have.  If you don't have plain yogurt, feel free to use sour cream.

Thursday, March 15, 2012

DIY - Taco Seasoning


I enjoy mexican foods any time of the year.  When I make it myself, I don't really make what some would deem "true" mexican foods but rather the classic, americanized idea of tacos and taco salad and the wonderful variations that come from this.  This seasoning mix adds some great punch to any choice of meat, soup or to sourcream/cream cheese to make a dip.


I know some would ask "why bother?" when you can buy a $1.00 package mix.  Buying it is certainly easier indeed but I am learning that "easy" is not always "better".   The primary reason I made it was because I did not like what I saw in the ingredient list of the mix I did buy for $1.00...reason enough for me.  Some of you might like to do it just so you can say "I did it!".  Others of you might just be curious enough to try.  As is true with most of life, even the simple things (like this seasoning) taste better when you take time to do it yourself.  Whatever your reason, if you try it, I have no doubt you will enjoy it so much that you will make it again once your mix is gone!! 


This recipe was inspired by Emeril's Southwest Seasoning however I have cut down on the spice to accomodate my family's milder taste buds.  I think it still has a great kick to it for "family- friendly" food.


DIY Mexican Seasoning

2 Tbsp chili powder
2 Tbsp paprika
1 Tbsp ground coriander
1 Tbsp garlic powder
1 Tbsp oregano
1 Tbsp sea salt
2 tsp cumin
1 tsp black pepper
1/2 tsp cayenne pepper
1/2 tsp crushed red pepper


Warning: before needing this mix for a recipe, you may be required to go shopping first to ensure you have enough of the specific spices =)

I would highly suggest pulling out all your spices needed for this recipe and lining them up on your work surface along with sufficient measuring spoons (this may require a trip to your grocery store or bulk food store to get enough of each spice first).  Use a large bowl with a flatter surface, or even a plate lined with parchment paper (or even regular clean paper).  Measure out all your spices onto the plate/bowl placing each new spice in a different spot*.  Once all the spices have bene measured, mix and store in a "DIY" jar!* This makes approximately just over 1/2 cup of taco mix
.
Use 1 - 2 Tbsp seasoning for 1 lb ground meat or as desired. *


Cook's Notes:
Combining ingredients:  I learned from a wise chef, that when mixing spices such as this or making a curry, it can be easy to forget which spice was added if you just dump them in randomly into a jar.  One tip she suggested was using a larger bowl or even a plate ( line with parchment paper to allow you to pour it easily into a smaller jar once you are done), and dump each spoon in a separate place so you can see where each item is and if it is two or three measurements there already.  I do this and not only does it make sense, it makes it quite beautiful too!


Measurement Conversions:
1 Tbsp = 3 tsp
4 Tbsp = 1/4 cup


The Labeller: I'll be the first to admit this item is completely unnecessary in life, but when you have one....so fun!!  Makes all those efforts to do things yourself so much more complete, professional and fun!  I would hate to be without mine.

How to use the seasoning:
1. Add to ground beef for taco meat.
2. Add to soup for a taco soup flavour (ground beef, tomatoes, corn, beans, beef stock, seasoning as desired).
3. Add to cream cheese/sourcream mix for layered taco dip.
4. Use as a run on chicken, fish, beef or pork and grill.

Tuesday, January 31, 2012

Orange Cranberry Loaf


I made this recently to share with friends while we talked about food...what else do foodie friends do when they get together!!! We all LOVED eating this loaf. In fact, we all ate more than the "polite" serving cause it was just so good.  And requests were made for the recipe so here it is!


Hope you have some time to bake this for your friends and family this winter too.  I currently have one in my oven to enjoy with a good friend later today.  Food is so worth sharing. 

Oh yeah, credit for this original goes to my mother in-law, who got it from "Aunt Minka" , who got it from a cookbook called "Schmecks Appeal" - definite Dutch or Mennonite roots in that word "Schmecks"!   Love it!  I just swapped out the wheat and sugars!


Orange Cranberry Loaf


2 cups spelt flour
1 1/2 tsp baking powder
1/2 tsp baking soda
1 tsp sea salt
1/4 tsp xanthan gum (optional)*
1/4 cup butter - room temperature
1 egg - lightly beaten
3/4 cup orange juice - fresh is best*
3/4 cup apple butter * or palm sugar
grated rind of 1 orange or 3 drops Wild Orange oil*
1 - 1 1/2 cup fresh cranberries - chopped*
1/2 cup nuts of choice (optional)
* See Cook's notes below


In a large bowl, mix together all the dry ingredients (flour, salt, soda, powder, and xanthan gum). Cut in the butter until it creates a fine crumb (or you can basically not tell it is there).
In another bowl, whip/whisk the egg, add the juice and apple butter and mix well.  Add the wet to the dry ingredients and mix until it is just moist.  Gently fold in the cranberries and nuts.

Using a loaf pan (approx 4 x 8)., line it with parchment paper for easy removal of the baked loaf.   Pour the batter in the loaf pan.  Spread the batter to the sides and corners so it is lower in the middle - this helps to avoid a high center that is unbaked.


Bake at 350 F for 1 hour.  Allow to sit for 5 minutes before removing from the pan.  Allow it to cool another 10 minutes before slicing.  Serve with a hot beverage and enjoy with a friend!  Really the best if eaten the day it is made.  It is so low in fat that it tends to dry out quickly.

For muffins, scoop the batter into 12 muffin cups (greased) and bake for 18 - 20 minutes.


Cook's Notes:
Xanthan Gum: this is a white powder that helps the crumb to stay together.  This loaf can be made with Spelt flour and no xanthan but you will notice if the loaf is left for a day or more, the loaf will tend to fall apart very easily - crumbly.  So your choice.  I try to use less of it in my baking but even a 1/4 tsp can make a difference.

Orange juice: since this recipe requires at least one fresh orange for the zest, I say just buy 2 oranges and squeeze out all the fresh juice inside.  Most delicious.  Of course, having a good juicer is most helpful in doing this.  I highly recommend the pampered chef one - LOVE MINE!!!


Apple Butter:   Wellesley brand is my preference. Check out my page on "sugars" for more details on this specifics of this but it is my Sweetener of choice.  This can be made with other sugars - I would try maple syrup or palm sugar before heading to the refined brown sugar.


Cranberries: You may want to cut up your cranberries a bit before adding them.  Large berries can create soggy pockets which no one likes.  Plus the loaf is not super sweet and with just a small tart bite, it is more enjoyable.


Wild Orange Oil: I have recently purchased doTERRA oils and have had some fun replacing oils for flavouring in my baking.  If you have an orange oils other than from doTERRA, PLEASE be sure it is safe for internal use as marked on the bottle, or contact me and I will help you get some.


Posted by Picasa